


Table of contents:
Key takeaways:
- Recording audio and video separately gives you cleaner, higher-quality results — and way more flexibility in editing.
- You can record separate audio and video tracks using video recording software like Riverside. Or, you can record each separately and stitch them together with an editing tool.
- Splitting tracks after recording is possible, but it won’t give you true isolated audio or full control over each participant's track.
If you want full control over your content quality, recording audio and video separately is essential. Separate tracks give you the flexibility to edit cleanly, fix crosstalk, and get better sound by recording with a proper mic.
The good news?
Whether you’re using multitrack software or recording each piece manually, recording audio and video separately is simple.
In this guide, you’ll learn how to record audio and video separately, step-by-step, so you can create polished, professional content every time.
How to record audio and video separately with separate track software
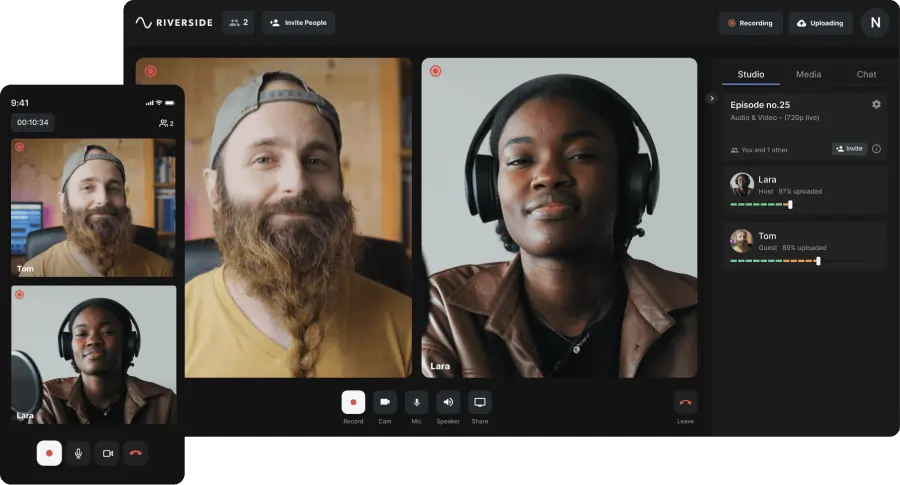
One of the most reliable ways to record high-quality audio and video separately is by using separate track recording software, like Riverside.
Riverside records each participant’s audio and video locally to each persons’ device. This ensures that recordings stay crisp and high-res, even if your internet connection is glitchy. It also provides you with a separate audio and video track for each participant, allowing you to edit and adjust them separately in post-production.
The platform standouts because your separate audio and video tracks stay in sync. You won’t need to sync anything manually when you’re editing.
Recording separate audio and video tracks is a default setting, so you don’t need to set anything up. Here’s how to get started.
Step 1: Sign up or log in to your Riverside account.
Step 2: Choose an existing studio or create a new one. Just click “+ New studio” at the top of the studio list and set one up. (You can learn how here.)
Step 3: In the studio dashboard, click “Record”.

Step 3: If you haven’t already, plug your microphone and camera into your computer.
Test your devices, select the right inputs, and ensure everything looks and sounds good. Then fill in your name, and click “Join Studio.”

Step 4: Within the studio, click “Copy Link” to share the invitation with guests. Alternatively, use “Invite by Email” to send invitations directly.
You can invite up to 9 guests to join you! (And, yes, each one will have their audio and video recorded in a separate track.)

Step 5: Once all participants have joined and are prepared, click the red “Record” button to begin. Riverside will record each participant's audio locally, on separate tracks.
Step 6: When you're done recording, click the “Stop” button. A pop-up will appear, wait for the recording to fully upload to the cloud, then click “View recordings”.

Step 7: In the recording dashboard, select “Recording files” to view your separate tracks.
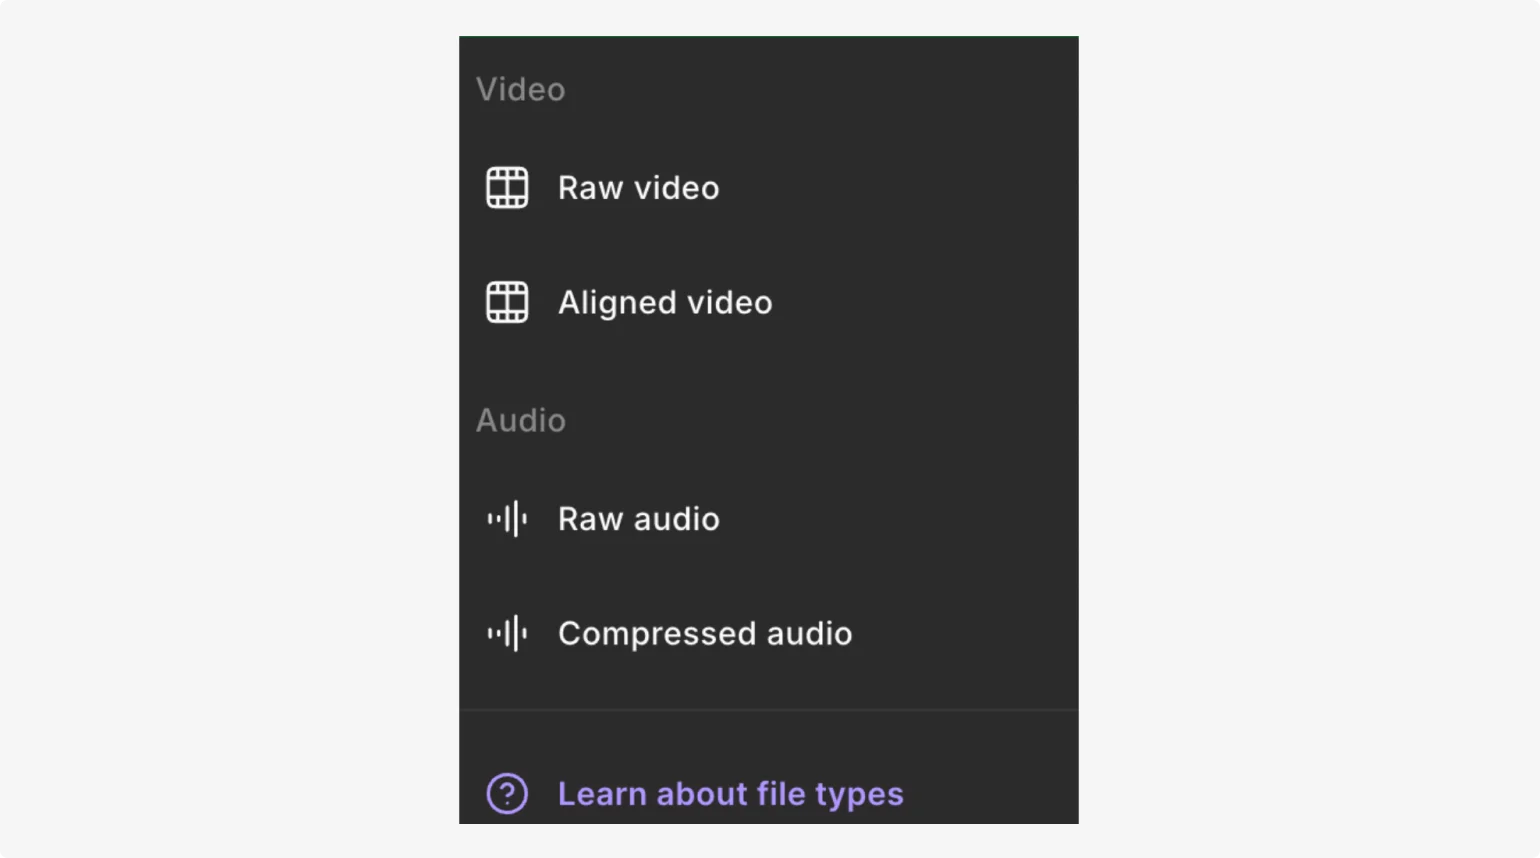
Step 8: Click the download button with “High-quality”. Here you can download the:
- “Raw video”: The video recording completely untouched.
- “Aligned video”: This includes padding where needed to keep all participant tracks in sync.
- “Raw audio”: The original audio recording.
- “Compressed audio”: The audio recording compressed around 10 times less its original size.
And just like that-you’ve got your separate tracks. But, if you want, you can also edit your recordings in our multitrack editor.
Just go back to the Project dashboard, hover over the recording and click “Edit”.
In the editor you can:
- Cut background noise, cut filler words, shorten silences, enhance audio and mute crosstalk with quick automated audio editing tools.
- Overlay b-roll, images, text or music using the toolbar.
- Add and style animated captions to your video.
- Trim your recording using the smooth timeline or using your recording transcript.
- Set each scene layout to best match the current speaker.
And more.
Once you’re done editing, click “Export”. You have the option to export your full video, or the audio only if you’re creating content like a podcast.
Further Reading: How to Extract Audio from Video | 9 Best Methods & Tools
How to manually record audio and video separately

If you're not using an all-in-one tool like Riverside, you can still record audio and video separately–it just takes a little more work.
Here's how to do it right:
Step 1: Set up your camera
Choose your camera: DSLR, mirrorless, webcam, or smartphone. Mount it on a tripod or stable surface and frame your shot.
Lock in your lighting and background so you’re not adjusting things mid-recording.
And if you’re using a camera with a microSD card, double-check that you have enough storage to capture your full recording.
Step 2: Set up your microphone
It’s time to set up your microphone. You have different options:
- Portable recorders are best for recording on the go. They capture high-quality WAV files directly to a microSD card — no laptop needed. You can try options like the Zoom H4n or Tascam, or check our full list of the best podcast recorders.
- USB microphones plug straight into your computer and work well with free software like Audacity or GarageBand. They’re perfect for solo podcasters or simple remote setups.
- XLR microphones offer the most flexibility and quality — especially for multi-person setups. You’ll need an audio interface like the Focusrite Scarlett 2i2, or an all-in-one recorder like the Rodecaster Pro, which can record directly to a microSD card. Just note: XLR setups tend to require more gear and budget.
If you are recording with multiple guests, the setup is a little more intricate. We recommend checking out our comprehensive guide on recording with multiple microphones.
Regardless of your choice, make sure you position your mic close enough to get clear, crisp sound without distortion.
Step 3: Start recording
Hit record on your audio first, then your video. This ensures your full audio is captured from the start, even if your camera lags by a second.
To help you sync up your video and audio later, keep your camera’s built-in mic on so that you can match up the audio waveforms from the two audio tracks.
Step 4: Clap for syncing
Clap your hands in front of the camera at the start of each take. That sharp audio and visual spike makes syncing way easier during editing.
Step 5: Manage your files
Once your recording is done, download the video and audio from the SD cards or export them from your software of choice. Move all your video and audio files in the same platform for post-production.
Step 6: Syncing audio and video
When you record audio and video separately, the files need to be synced with a dedicated editing software, like Adobe Premiere Pro or DaVinci Resolve.
You can do this manually by aligning the waveforms on the timeline editor. Use the spike in your waveform created from the clap to help you.
But, the faster way is to see if your editor has a syncing tool. This should sync your video and audio automatically for you.
You can check our full guide on how to sync audio and video for a more detailed step-by-step.
Final thoughts
Recording separate audio and video tracks is pretty simple - especially if you use recording software like Riverside. But no matter how you do it, the results are well worth it. Separate tracks allow you to edit with precision - and without compromise - for the highest quality results. Want to try it for yourself? You can record up to two hours of multi-track recordings for free on Riverside. Sign up today!
FAQs on how to record audio and video separately
What can you do with multi-track recordings?
Still confused about why recording audio and video on separate tracks is a game-changer? Here are a few ways it can help you make better videos:
- Remove noise or adjust volume for one speaker without affecting the others. Did someone couch or rustle papers? You can just mute or lower their audio at that moment.
- Cut out awkward pauses or filler words. You can trim out words like “um” and “ah” from one person’s audio without disrupting others’ speech or lip sync. (Riverside even has a tool that does this with one click.)
- Swap visuals without affecting sound. Want to cut to someone’s reaction while another is speaking? You can edit the video feed independently of the audio.
- B-roll or screen share flexibility. Insert visuals or screen shares over someone’s voice without needing to show their video.
How do you separate audio from video online for free?
Free tools like Clideo and Kapwing let you split audio from video easily. But they don’t provide individual tracks for each participant. Plus, when the audio is extracted from the video, it may be compressed. That’s why it’s better to record separate tracks from the start (no editing later). This ensures higher quality audio and video, and allows you to make more refined edits. It also ensures that audio and video stay synchronized. Did we mention that Riverside is a super easy way to do this?
Can you record video and audio separately in OBS?
Yes, you can record separate audio and video tracks in OBS Studio by adjusting your audio mixer and track settings. It works well but takes manual setup. With Riverside, separate track recording and syncing is automatic - no tech skills needed.
How do you record audio and video separately on an iPhone?
You can use the Camera app for video and Voice Memos for audio, then sync them manually in iMovie. Or skip the hassle - Riverside’s mobile app records separate, high-quality tracks and syncs them for you automatically.
Just open the Riverside app on your iPhone, invite your guests and start a new recording session. Once you’re done, go back to the browser-based app, choose your recording, and click on “Recording files” to download each individual track in high quality. You can also check how to record professional videos with your smartphone here.
How to record game audio and voice separately?
You can use OBS Studio to record game audio and your microphone input on separate tracks without the need for additional audio routing tools. Simply enable multiple audio tracks and then assign audio sources to each track. You can see a step-by-step on how to do this here.


.png)


