.webp)


Table of contents:
Recording a podcast with multiple guests? The last thing you want is messy, overlapping audio or background noise ruining a great conversation.
The easiest way to fix that is by giving every speaker their own microphone. Setting it up is easier than you might think.
In this guide, I’ll show you how to record a podcast with multiple mics using 3 simple methods. Whether you're recording in person or remotely, you'll walk away with a setup that captures every voice clearly and professionally.
Let’s dive in.
Top 3 options for recording 2 or more people
There are multiple ways to record a podcast with more than two people, but these 3 methods will give you the best results without overcomplicating things.
Disclaimer: Please see our help site guidelines to check the compatibility of any equipment with Riverside.
Recording a multi-person podcast with online recording software
Best for:
- Podcast hosts who interview remote guests.
- Budget-conscious beginners looking for a simple, plug-and-play recording solution.
- Anyone not tech-savvy enough for complicated audio gear setups.
Planning to record with remote guests without breaking the bank on fancy gear or wrestling with complicated tech? An online remote recording platform is your best bet.
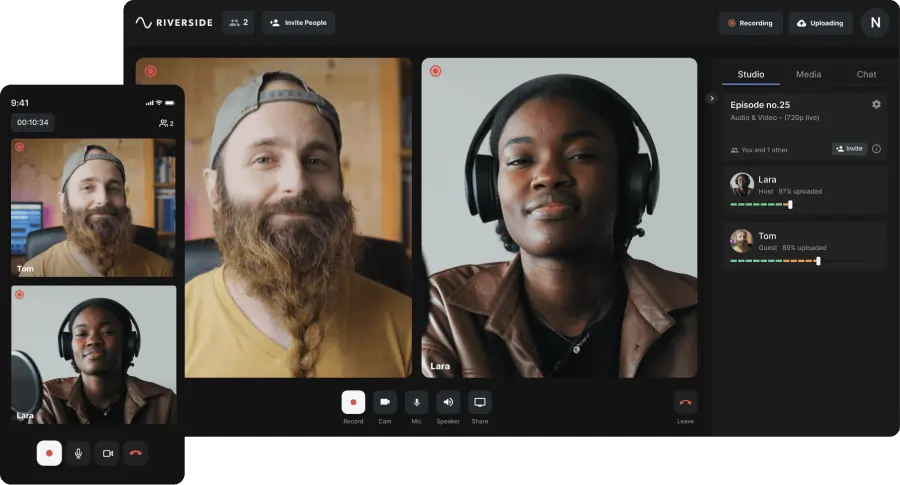
Platforms like Riverside make recording multiple guests easy. Just send each participant a simple invite link, and they can join your session from any device. No complicated tech setup needed.
And quality stays top-notch with the right remote recording software. For example, Riverside records directly on each person’s device instead of relying on your internet connection. Everything uploads to the cloud in real-time for a smooth, reliable local recording — even if someone’s Wi-Fi connection cuts out.
You'll also receive separate audio and video tracks for each participant, making editing clean, especially when cutting out crosstalk.
If you want the highest quality with the least amount of hassle, this is the way to go.
Downsides:
With some software, your recording quality hinges on the stability of your guests’ internet connection and the quality of their mic setup. To avoid this issue, look for platforms that have local recording and audio enhancement features.
Your guests will also need to set up their own equipment. But, this can be as simple as using a smartphone as a webcam and a plug-and-play USB mic.
Using a digital recorder

Best for:
- Creators who need the flexibility to record anywhere – either on the go or at home.
- Podcasters who want professional sound quality without a complicated setup.
- Anyone who needs to get separate tracks for easy editing.
A digital recorder is a small device that captures audio signals and converts them into digital data. This data is stored on SD cards, flash drives, and other storage media.
Since digital recorders are portable, they’re perfect for recording without being tied to a computer. Whether in a coffee shop, at an event, or on the go, you can plug in your XLR microphones to a portable digital recorder, hit record, and you’re good to go.
Digital recorders like Zoom H6 and PodTrak P4 are great for this purpose: they’re portable, have multiple XLR mic inputs, and let you record on separate tracks. Popular XLR mics include the Shure MV7 AND Shure SM7B.
Check out our guide on the best digital recorders for more recommendations.
Downsides:
Quality digital recorders aren’t exactly cheap, often costing upwards of $200. Plus, you’ll need to manually transfer your files to your computer before you can edit them.
Connecting multiple mics with a USB audio interface

Best for:
- Podcasters recording in a dedicated studio or home setup.
- Creators looking for high-quality sound with precise audio control.
- Hosts who record with in-person guests.
A USB audio interface acts as a bridge between XLR microphones and your computer, turning your home setup into a mini recording studio.
It delivers professional-grade sound quality and lets you control each person's audio with great precision. If one person is too loud or quiet, you can adjust their volume in real-time to ensure a balanced mix.
Popular models include the Focusrite Scarlett 2i2, which is perfect for a 2-person podcast setup or the Focusrite Scarlett 18i8, ideal for 3 or 4 people. This setup is often used in a professional studio setting.
If you want to know the best mics for recording in a studio, check out our guide to the best studio microphones.
Downsides:
Audio interfaces require a little more tech know-how to operate them smoothly, especially if you want to record directly to your computer.
How to record a podcast remotely with multiple mics using online software
Want to record a remote podcast with multiple mics, crystal-clear audio, and no technical headaches? Then look for an online software platform, like Riverside.
As we mentioned above, with Riverside, you can invite up to 9 guests with just a link – no downloads or sign-ups required. Record everything in studio-quality with up to 4K video and 48kHz audio resolution, no matter how many mics. You’ll get separate tracks for each guest, and you can edit in one smooth workflow with our video editor.
We’ve got automated tools for audio enhancement, background noise removal, trimming your recording, and more – all built to create a crisp-sounding podcast in minutes.
Here’s how to record your multi-mic remote podcast with Riverside:
Step 1: Create a Riverside account
Sign up at Riverside.fm and login to your dashboard. From here, create a new studio or select an existing one from the left sidebar.
If you need to create a new studio, click on the studio list and select “+New studio”. Then follow the prompts to set it up.

Step 2: Setup your studio
Click on the “Record” button.

On the following screen, add your name, choose among the various camera and audio settings, and press “Join Studio.”

Step 3: Invite guests
Now that you’re in the Studio, you can invite up to 9 guests to your podcast. Copy the link and share it manually, or send the invitation via email. Each guest can join remotely with their own microphone.

Step 4: Pre-recording setup
Once all the guests have joined, make sure the guests' audio levels can be heard clearly.
Click on the “People” button on the right sidebar, then adjust individual volume sliders or turn on echo cancellation.

From the right sidebar, you can also change the layout, add brand fonts and colors, and add lower thirds if needed.

Step 5: Record
When you’re ready to record, click the “Record” button. Once you’re done with the, click on the “Stop” button.

Step 6: Export your files
After you’ve recorded each participant, you can download their recording tracks. To do so, click on the “View recordings” pop-up.
Alternatively, you can find your recordings in your dashboard, under “Projects.”

Scroll down under the video and click on “Recording files.”

To download individual video and audio files, click on “High quality” and choose between raw video, raw audio (uncompressed WAV), or compressed audio (smaller MP3).

That’s it! You’ve now successfully recorded with Riverside. You can further edit the videos by clicking on the Edit option. In the editor you can:
- Trim your recording as easily as deleting text in the transcript.
- Add captions, b-roll, images, music, and text.
- Enhance your audio using quick automated tools.
- Remove filler words and cut long silences.
And much more.
Ready to simplify your podcast production? Learn more about making podcasts with Riverside — or sign up and start recording in studio-quality today.
How to record a podcast with multiple mics in person
There are 3 main methods to record an in-person podcast with multiple mics:
- Using hardware such as an audio interface or digital recorder
- Using multiple devices (desktop or mobile)
- Using a single device with multiple browsers
Let’s start with the first one.
Method 1: Using only hardware
If you're looking to create a film-production level podcast, then using hardware will give you a lot of control over quality.
Recording onto a device gives you extremely clean, uncompressed audio and can keep every mic feed completely separate. But it also means managing audio levels manually, more storage requirements, extra gear costs, and a steeper learning curve for setup and troubleshooting.
Each device has its own setup process, depending on how many microphones you’re connecting and what format you're recording in. While we won't cover full step-by-step instructions for every device, the general workflow usually looks like this:
Step 1: Connect your microphones to the hardware recorder using XLR cables.
Step 2: Assign each mic to a separate track if your recorder allows it (some devices do this automatically).
Step 3: Save your recording directly onto the recorder’s internal storage or a microSD card.
Step 4: Transfer the files from your recorder to your computer after the session.
Step 5: Upload the tracks into your audio workstation or editor to polish your final episode.
Tip: Always double-check your storage space and battery life before starting a session!
For most creators, online recording platforms are the better option. They offer the best of both worlds: studio-quality results with a lot less complexity.
Method 2: Using multiple devices
Step 1: Set up the hardware
For this setup, you need a separate device (desktop, laptop, or mobile) for each participant. If you or your guest are using a mobile device, make sure they have the Riverside app installed.
Plug any desktop device to an external microphone. Don’t plug the mics to the mobile devices, yet. You don’t need headphones since you’re all hearing each other.
Step 2: Set up the host device
Log in to your Riverside dashboard and click on the “Record” button. On the lobby screen, add your name, and select the external microphone as both the mic input and speaker output.
Since you’re all going to speak in the same space and there’s no need to activate echo cancellation, select “I am using headphones” even if you’re not going to. Then, click “Join Studio.”
Even though you're not wearing any, click "I am using headphones." Since you’re all going to speak in the same space, this just makes sure no sound comes from your device's audio. Then click “Join Studio.”

Step 3: Invite your in-person guests
From your studio, copy the invite link and send it to your in-person guests. Each guest can join the studio from their device using the link you just provided.
Step 4: Set up the in-person guest devices
If your guest is joining from a desktop:
Have the guest accept the invite from their device. Then, from the lobby, they should set their microphone as both the audio input and output and pick the “I am using headphones” option, just like you did.
If your guest is joining from the mobile app:
The guest should first accept the invite, then plug in the microphone. A pop-up will appear asking, “We recognize a wired connection to the device. Are you using it only as an external microphone?” They need to select “No" so the microphone will be used as the audio input and output.
Step 5: Record
When ready, hit the red “Record” button in your studio. After you’re done recording, hit “Stop”. Then you can start editing your files.
Method 3: Using a single device with multiple browsers
Step 1: Set up the hardware
If you have only one computer at your disposal, you can still record with multiple mics by launching Riverside on multiple browsers. Note that you need to launch Riverside on different browsers – not just different windows of the same browser. We suggest using Chrome and Microsoft Edge or Brave.
You also need multiple cameras, so you can pick multiple video feeds during your recording.
Please keep in mind that this setup can be very resource-intensive, so make sure you’re using a powerful enough desktop or laptop PC. This means, while 2 browsers is still doable, very few computers will be able to handle 3 different Riverside instances at the same time.
Note: You can save some processing power by using a single camera. This way you’ll have a single video feed. But, you’ll need to make sure that all the participants are caught by the same camera.
Step 2: Set up the host device
You need to launch Riverside on multiple different browsers – not just different tabs or windows. We suggest using Chrome and Microsoft Edge, or Brave.
Log in to your Riverside dashboard from the first browser, and click on the “Record” button. On the lobby screen, add your name, and select your audio and video output.
You don’t need headphones since you and your guest will be in the same room. For this same reason, select “I’m using headphones” to keep the quality of the audio as high as possible. Then, click “Join Studio.”

Step 3: Invite your in-person guests
From your studio, copy the invite link. Open a new browser (not a new window of the same browser), paste the link, and join the session.
Step 4: Set up the in-person guest devices
From the lobby, pick the microphone and camera you want to use for your guest, then choose “I am using headphones.” You can pick the same speaker as the host.
Step 5: Record
When ready, hit the red “Record” button from the host studio. After you’re done recording, hit “Stop” to head to the dashboard, where you can download your recording, or head to the editor.
Hybrid setup: How to record a podcast with in-person and remote guests together
You've learned how to record with multiple guests and mics in person and how to record remotely with Riverside. But what if some of your guests can record with you in person and some can only be reached remotely?
Here’s how you record a hybrid podcast in Riverside:
Easy Guide to Hybrid Podcasting: In-Person + Remote Guests
Step 1: Prepare your devices (with or without external mics)
As a host, use a desktop or laptop (Mac or Windows) with a built-in webcam and microphone. The in-person must use a mobile device (iPad, Android, or iPhone) with the Riverside app installed.
Plug your microphone into your laptop and use a headphone splitter to connect both wired headphones to it. This way, you’ll avoid having to mute and unmute yourself during the podcast, and you and your in-person guest will both be able to hear the remote guest.
Step 2: Set up the host device
Create a Riverside account and log into your dashboard. When you’re in the dashboard, click on the “Record” button.
On the lobby screen, add your name, and select the USB microphone as both the mic input and speaker output (as both the headphones are connected to the mic).
Select “I’m using headphones,” then click “Join Studio.”

Step 3: Invite the remote guest
Copy the invite link and send it to your in-person and remote guests. The remote guests can join the studio using their own setup.
Step 4: Set up the in-person guest device
Use a USB-C cable to have the in-person guest connect using another USB microphone to the mobile device.
Once that's done, they should open the studio guest link you provided earlier. A pop-up will appear asking, “We recognize a wired connection to the device. Are you using it only as an external microphone?” They need to select “No."
This way the microphone will be used as the audio input and output, and your guest will be able to hear the entire conversation from the headphones connected to the first mic.

Step 5: Start the recording
Do a quick sound check, then once you’re ready, start the recording by clicking the “Record” button. Each of your participants' separate tracks will be recorded locally on their own devices with no echo or feedback.
FAQs on how to record a podcast with multiple mics
How many mics do you need for a podcast?
The number of microphones you'll need depends on how many people are speaking. Ideally, each person should have their own mic to improve the sound quality. Also, post-production will be easier since each speaker’s audio can be edited separately.
Sharing microphones can lead to issues like crosstalk and audio bleed, making your recording harder to manage. Plus, when people move closer or farther from the mic they’re sharing, their voices can sound uneven.
How do you record a podcast with multiple people in the same room?
For recording multiple in-person guests, you can use an audio interface like the Focusrite 18i8 to connect multiple XLR mics. Or you can use a digital recorder.
You can also use an online platform like Riverside, which lets both in-person and remote guests join from their phone or laptop.
How do you record a podcast with two hosts remotely?
The easiest way to record a remote podcast with two hosts is to use an online platform built for high-quality recording. For example, Riverside captures 4K video and 48kHz uncompressed audio with up to 10 participants. Plus, everyone’s audio and video are recorded locally on separate tracks that will be uploaded automatically.


.webp)
.webp)

