(copy)%20(2).webp)


Table of contents:
How to create a split-screen video on Mac and PC
How to make a split-screen video on iPhone
How to make a split-screen video on Android
How to do a split-screen video on Facebook
How to make a split screen video on TikTok
How to make a split-screen video on Instagram
Key takeaways:
- A split-screen video shows multiple clips next to each other, all in the same frame.
- You can create split-screen videos directly on platforms like TikTok or Instagram. But you’ll get more flexibility with dedicated editing software.
- Look for software like Riverside, which lets you apply different split-screen layouts in a few clicks.
Split-screen videos are everywhere — from reaction videos to podcast clips. But while some social platforms offer basic split-screen tools, they’re often limited (and a little clunky).
We’ve got a better way. This guide breaks down how to create split-screen videos step by step — plus the best apps to get the job done, whether you're on desktop or mobile.
Let’s dive in.
How to create a split-screen video on Mac and PC
How to create a talking-head split-screen video from scratch
If you want to stitch together two existing clips, go to the section on how to edit split-screen videos.
Starting from scratch? Here’s the fastest way to do it with Riverside.
You can record and capture up to 9 participants, all of whom you can later add to your split-screen layout.
Want to give it a try? Simply follow these steps:
Step 1: Log in to your dashboard and enter an existing studio from the studio panel on the left. You can also create a new one by clicking on the studio list and clicking “+New Studio”
Step 2: Click on “Record” to enter the studio. Check your equipment in the lobby, then click “Join studio”.
Step 3: If you haven’t already, invite your guests. Just click “Copy link” or “Invite by email”

Step 4: Once you and your guests enter the studio, you can adjust the layout for your live feed (if you have one). You can choose from Grid, Speaker full screen, or Speaker split screen.
Either way, Riverside will record a separate track for each participant, so you can edit the footage any way you want.
Note: Guests do not see your live layout, but choose their own. Audience and live stream viewers will see your layout.

Step 5: When you’re ready, hit “Record.”

Step 6: When the session is over, stop the recording and wait for the app to process your audio and video files.
Click “View Recordings” to open the recorded video.

Tap “Edit” here to view this video in the editor.

Step 7: Before making any edits, go to the “Layout” tab on the editing panel on the right. Choose your desired split-screen layout and adjust settings like rounded corners.

Or, you can use Riverside’s new Smart layouts feature to easily customize your layout frame by frame.
Step 8: Then, you can edit and fine tune your video using Riverside’s intuitive editing capabilities.
You can:
- Clean your audio by removing filler words and pauses, or use Magic Audio to enhance sound quality with a click.
- Add background music to make your side-by-side videos more engaging. Upload your own track or select one from Riverside’s built-in library.
- Generate captions automatically for your videos in 100+ languages.
- Add text overlays with different animations and formatting styles.
Step 9: Finally, you can also adjust the aspect ratio of your video based on where you want to publish it, then click “Export” to finalize your edit.

See? It's just as easy as that! Don't take our word for it. Create a split-screen video and check it out yourself.
How to make a split screen video using existing clips
Already recorded your video clips and just want to place them side by side or in a grid?
If you’re using more advanced software, this may involve cropping and dragging your videos into place. For example, we cover this in our video on split screens.
If you want a smoother alternative, you can use a platform like Canva. The process will usually look similar to this:
Step 1: Create a new video project in Canva. You can choose a specific aspect ratio like 16:9 or 9:16 depending on where you're posting.

Step 2: In the right toolbar, click “Uploads”, then “Upload files” to add the video clips you want to use. Drag each clip onto the canvas.

Step 3: Resize your clips by dragging the corners and edges. You can then drag your clips to position them as you like.

You can go side-by-side, top-bottom, or even a grid with more than two videos.
Step 4: Use Canva’s timeline to trim, sync, or rearrange your clips as needed. You can also add text, transitions, background music, or custom branding.
Step 5: When you're happy with your layout, click “Download” to export your finished split-screen video.
How to make a split-screen video on iPhone
Want to make a split screen video directly on your iPhone? You can do this using the free iMovie app.
Step 1: Download or open the iMovie app.
Step 2: Tap on “Create Project” and select “Movie.”
Step 4: Choose your first video clip and tap “Create Movie.”
Step 5: In the timeline, move the playhead (white vertical line) to the point where you want the split-screen effect to begin.
Step 6: Tap the “+” button above the timeline to add another clip.
Step 7: Navigate to “Video” and select your second clip, then tap the three-dot icon and choose “Split Screen” from the options that appear. This will place the two clips side by side on the video timeline
Step 8: Tap on the second video in the timeline. It will be highlighted in yellow indicating it’s selected. This will open additional controls in the preview area. From here, you can either swap the clips, add or remove a divider line, or zoom and reposition the clips inside the frame.

How to make a split-screen video on Android
If you’re looking to make a split-screen video directly on your Android phone, CapCut is a great option. Here’s how to use it:
Step 1: Download CapCut to your Android device, then open it and tap “New Project” to get started.

Step 2: Select your two (or more) video clips from your device. Then select your first clip within the app and tap “Add.”

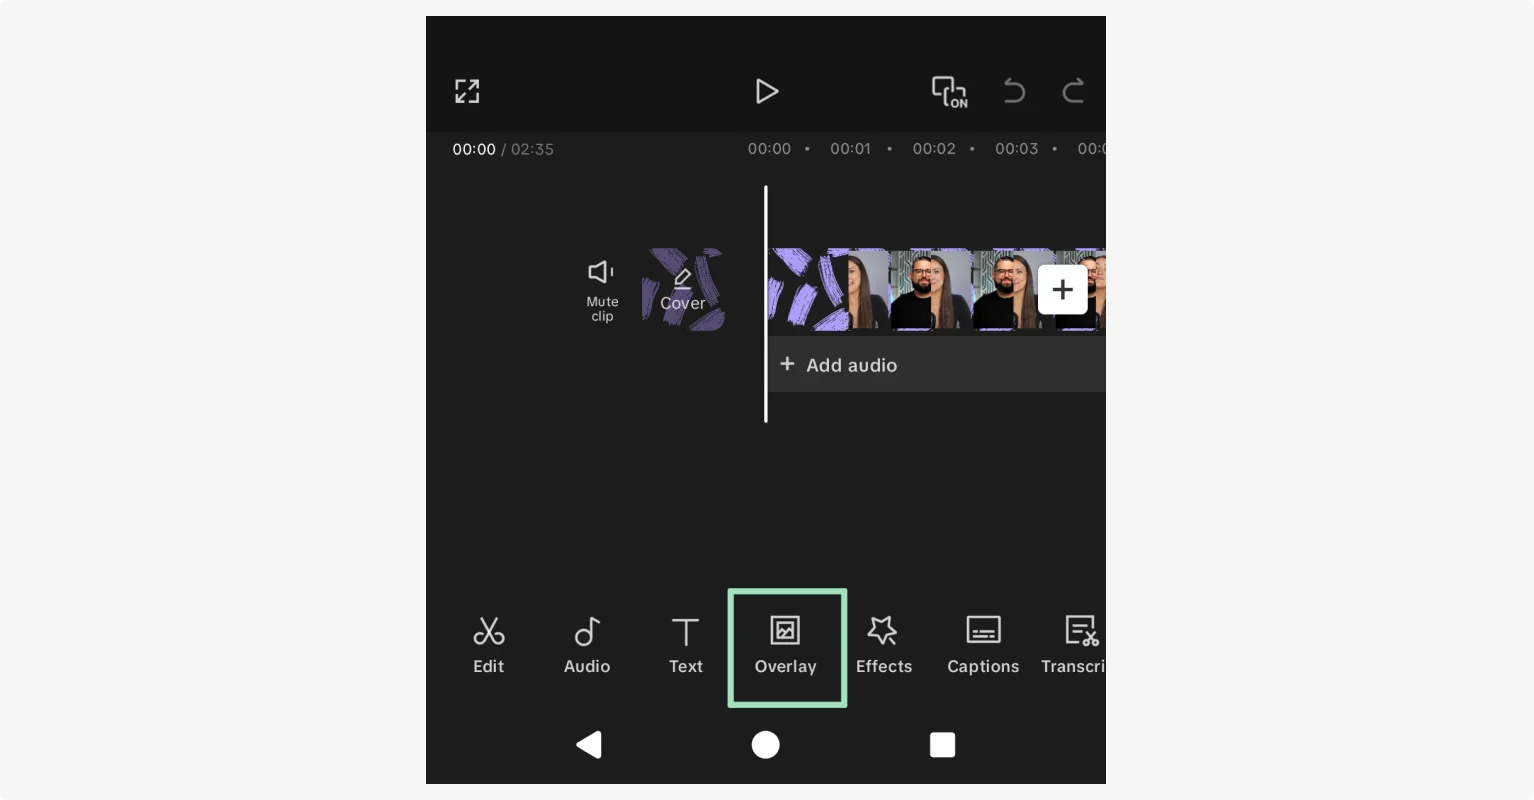
Step 3: In your timeline, tap on “Overlay” and then “Add Overlay.” Now you’ll see both video clips on your timeline, one over the other.
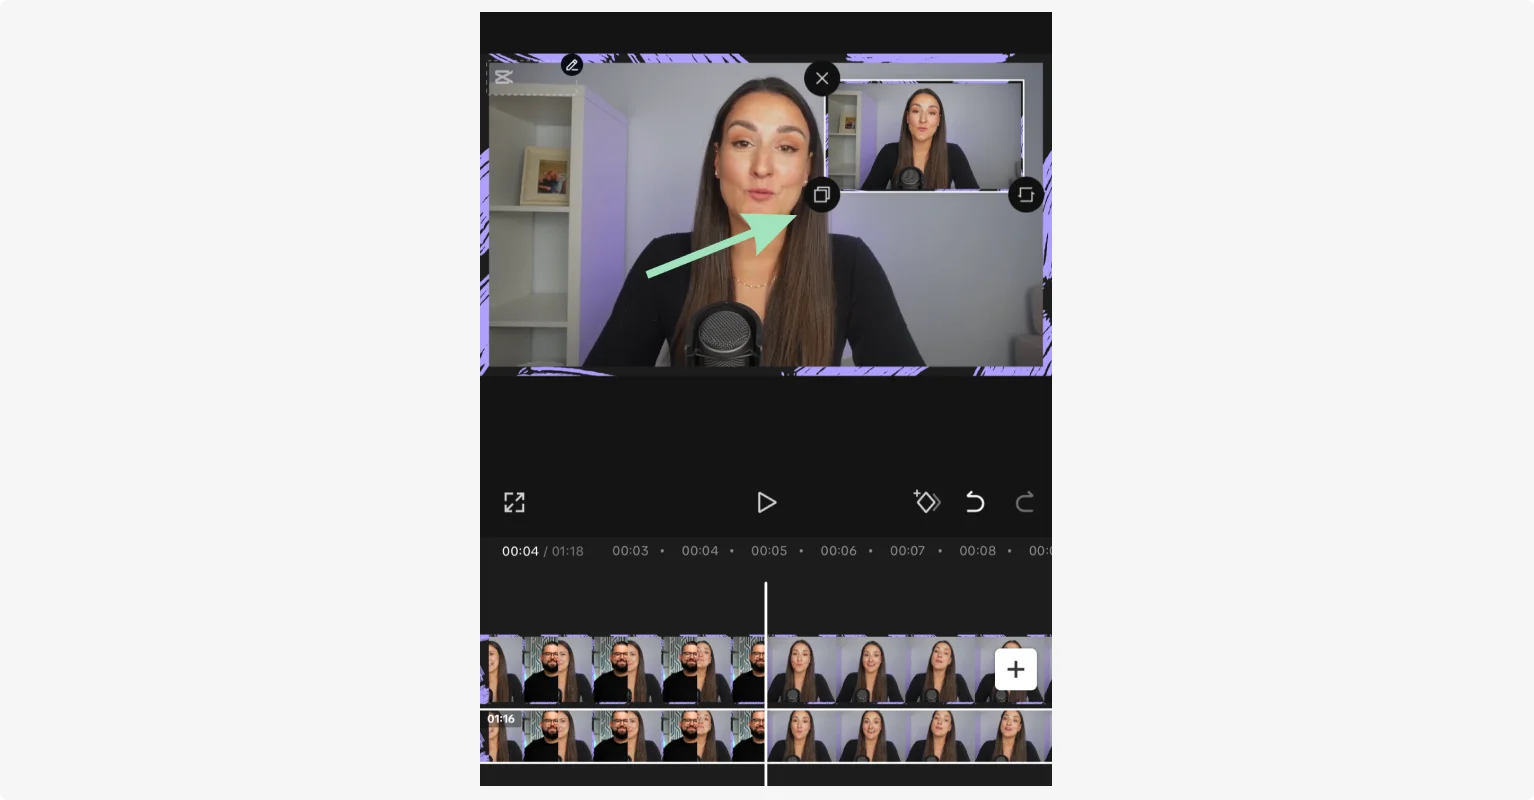
Step 4: Tap on the overlay clip in the timeline to select it. Then use the pinch and drag gestures in the preview window to resize and reposition the overlay video. You can adjust each video individually by tapping on it in the timeline.
Step 5: For faster and more precise splitting, scroll through the bottom menu and tap on “Mask.” This will allow you to select from preset layouts. Select one to have it applied automatically.

Step 6: Tap the “Play” button to preview your split-screen video.
Step 7: Once satisfied, tap the “Export” button at the top of your screen.

How to do a split-screen video on Facebook
If you want to create split-screen video for Facebook, you can use video editing software (like Riverside) to create the video, then upload it to Facebook. However, many people also want to make a split-screen for Facebook Live. This is something you can do on the Facebook app, but only on mobile. If you’d like to broadcast a split-screen video live from your desktop, you can do it using live streaming software like Riverside.
Here’s how to create a split-screen video using Facebook Live on your mobile device:
Step 1: Open the Facebook app on your mobile device. From your home screen tap “What’s on your mind?” then tap “Live video.”

Step 2: Tap the privacy settings below your name to select your audience. (Note that live videos broadcast from a Page are Public by default.)

Step 3: Tap to add a description to your post. You can also tag people who might be included in your video.
Step 4: When you’re ready, tap “Go Live.”

Step 5: Once you’re live, tap the “Bring a Friend” icon (it looks like two heads). Select a viewer from the list to invite them to join your broadcast.

Step 6: After the guest accepts your invitation, they will appear in split screen alongside you.
Step 7: To remove the guest, tap the “X” on their video feed. To end the live session, tap “Finish.”
Read: How to Live Stream on Facebook
How to make a split-screen video on TikTok
Split-screen videos are very popular on TikTok. How you make one depends on what kind of split-screen video you want to make.
You can use TikTok’s Duet feature to play an existing TikTok on one side of the screen while you record yourself on the other. This is great for reaction videos, dance-offs, and collaborative content.
The other option is to use TikTok’s Split effect to divide your screen into multiple sections, so you can display the same content simultaneously for effect. We’ll show you how to do both.
To make a split-screen Duet video on Tiktok, follow these steps:
Step 1: Open the TikTok app and navigate to the video you wish to duet with.
Step 2: Tap the “Share” icon (arrow) on the right side of the screen and select “Duet” from the menu.

Step 3: On the recording screen, tap “Layout” on the right and select your preferred split-screen style.

Step 4: Tap the “Record” button to film your segment alongside the original video.
Step 5: Tap the “checkmark” to end your video.

Step 6: Add effects, text, or filters to your video using the menu on the right side of your screen, then tap “Next” to add a caption and share your work.
To use the Split effect to duplicate your video into multiple frames on TikTok, follow these steps:
Step 1: Open the TikTok app and tap the “+” button to start a new video.
Step 2: Record a new video or upload an existing one.
Step 3: Tap “Effects” (stars) on the right side of the screen and select “Split.”

Step 4: Choose a split style, such as two, three, or four screens. You can adjust where the split screen effect appears by moving the playhead and then pressing and holding the split screen-effect.

Step 5: Tap “Save” to apply the split-screen effect to your video.
Step 6: Add captions and effects, then tap “Next” to add hashtags and a caption before posting your video.
Read: How to Edit TikTok Videos
How to make a split-screen video on Instagram
If you want to make a split-screen video on Instagram, Instagram’s Layout feature allows you to create split-screen effects directly within the app.
But this feature is only available for Stories. If you want to create a split-screen video for other types of Instagram videos, you can download your story and reupload it as a reel. Or, use a third-party editing app, or download Instagram’s “Edits” app.
Here’s how to create a split-screen video for your Instagram Story:
Step 1: Launch the Instagram app on your device and access Stories by tapping the “+” and then selecting “Story.”
Step 2: Tap the “Layout” icon on the left-hand side to choose a grid format, such as side-by-side or four quadrants.

Step 3: Tap the “+” in each section to capture a new photo or video, or select each one from your gallery.

Step 4: Enhance your Story by choosing stickers, text, and filters from the menu at the top of your screen.
Step 5: Once you're finished, tap “Your Story” to publish.
Top Split-Screen video editors and apps
If you want to make a split-screen video, it’s often a lot easier to do it using a video editing app. Even though some platforms offer split-screen functionality, you’ll still get a lot more control and higher quality results with video editing software. Here are our top picks for creating split-screen content.
Riverside - Best Overall
Price: Free plan available; paid plans start at $29.00/month
Compatibility: Browser-based, works with most operating systems
Riverside makes it easy to create split-screen videos thanks to its Layouts and Smart Layouts features. With Layouts, you can apply a split-screen effect - like a grid with a space for each speaker - across your entire video with a click.
Or try Smart Layouts, which dynamically changes your layout throughout scenes to give maximum impact to the current speaker.
You can also create scenes on your timeline and change the layout for each individually.
Beyond split-screen layouts, you’ve got a variety of AI tools for video creation from beginning to end. Record in high quality, stream with a customizable layout, and edit in minutes with automatic tools.

Key features:
- High-quality recording: Record locally in up to 4K resolution directly from the Riverside platform for top-quality footage every time.
- Customizable layouts: Choose from side-by-side, grid view, or allow AI to automatically highlight the active speaker.
- Automatic transcription: Get quick and easy transcription of interviews, then use it to instantly create captions.
- Text-based editing: Quickly edit your videos like editing a doc. Simply delete words from your automatic transcript - the corresponding video will disappear right along with them.
- Easy repurposing: Easily repurpose longer videos into short, shareable clips with Magic Clips. Then it’s just one click to export them in the right aspect ratios for TikTok, Instagram, and other platforms.
CapCut - Best for Android
Price: Free plan available; paid plans start at $9.99/month
Compatibility: Windows, macOS, Android, iOS
CapCut is a powerful video editing app that makes it easy to create split-screen videos on your phone. It’s also pretty easy to use, although it includes some higher-level editing tools for more complex split-screen effects.

Key features:
- Customizable templates: A wide selection of templates - including templates specifically for split-screen videos - make video editing fast and easy.
- Multi-layer editing: Stack multiple overlays to include more than two videos in your split-screen.
- Text and sticker integration: Enhance your split-screen videos with text overlays, stickers, and animations.
iMovie - Best for iPhone
Price: Free
Compatibility: macOS, iOS
We like iMovie for making split-screen videos on iPhone because it’s easy to use, provides adequate options, and will work seamlessly with your iOS device.
While iMovie doesn’t offer a lot of different split-screen options, you can split the screen side-by-side or top-bottom quickly and easily. Beyond split-screen effects, iMoive also provides other overlays for unique picture-in-picture effects.

Key features:
- Easy, interactive controls: Easily swap clip positions, adjust zoom levels, and add dividing lines for clarity.
- Slide-in transitions: Animate one clip sliding into the frame to create a dynamic split-screen effect.
- Integrated audio editing: Adjust audio levels for each clip to ensure balanced sound.
Filmora - Best for Desktop
Price: Paid plans start at $4.17/month
Compatibility: Windows, macOS, Android, iOS
Wondershare Filmora is a video editing app with lots of options. It’s a little more complex than the others on this list, but still easy enough to use once you get the hang of it. Best of all, it offers more than 86 split-screen templates, and the ability to split the screen in up to six sections.

Key features:
- Drag-and-drop functionality: Drag and drop your clips into the designated sections of your chosen split-screen template for fast and easy split-screen video creation.
- Customizable layouts: Customize split-screen layouts by adjusting the size, position, and borders of each video segment. You can also apply effects like rotation to each clip.
- Advanced editing tools: Try advanced editing tools like keyframing and animation to further enhance your split-screen videos.
Kapwing - Best free split-screen video editor
Price: Free
Compatibility: Browser-based
There are a few free options on this list, but we think Kapwing stands out because it works well on most operating systems, and it’s very easy to use. We also like that Kapwing makes it easy to create any split-screen layout without templates, so you’re only limited by your imagination.

Key features:
- Customizable, drag-and drop interface: Easily create any split-screen layout you like by dragging videos onto the canvas, then moving and resizing them.
- Timeline editing: Use the Kapwing timeline to adjust the timing of each clip. You can also trim, split, and rearrange clips here.
- Customization options: Add text, subtitles, shapes, and animations to enhance your videos. You can also remove the background, edit audio, and apply filters.
FAQs about split-screen video editors
Still looking for more information? Here are the answers to some frequently asked questions.
How can I make a split-screen video for YouTube?
YouTube does not include native features for making a split-screen video, so you’ll need a video editing app for that.
Any of the apps on this list will do the job, depending on your use case. For example, if you want to capture split-screen interviews, then Riverside is a good choice.
It’s an all-in-one platform for recording, streamin,g and editing your content with quick layouts for a custom split screen.
Learn more in How to Make a YouTube Video.
Are there any split-screen video editors that use AI?
Yes, a few split-screen video editors use AI to speed up video editing and make tasks easier. Some, like Riverside, even use AI for a dynamic split screen effect.
Our Smart Layout feature dynamically adjusts your video layout to focus on the speaker for maximum impact.
What’s the difference between split-screen and side-by-side video?
These two types of video are actually pretty similar.
But while side-by-side videos are two clips next to each other, split-screen videos can include more clips arranged in different layouts. You can think of a side-by-side video as a specific type of split-screen video.
Side-by-side videos tend to be used for direct comparisons, before-and-after shots, interviews, or reaction videos.
Split-screen videos, on the other hand, allow for multiple perspectives or scenes to be shown simultaneously. This can be used to showcase various viewpoints, or just for creative effect.


.webp)
%202023.webp)
.webp)

